 Enterprise Package
  Integrations
  Security
  Hardware
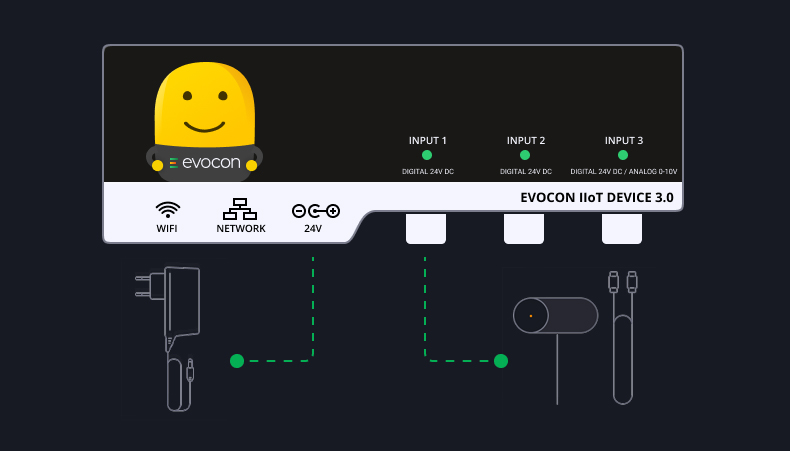
 How Evocon Works
  OEE Monitoring
  Increasing Productivity
 OEE Calculator
  Evocon
  Join us
 SMED (Single Minute Exchange of Die) is a foundational lean manufacturing methodology designed to reduce the time it takes to complete equipment changeovers as much as possible. By systematically converting “internal” tasks to “external” ones, manufacturers can reduce downtime and lot sizes.
Below, we explore the origins of SMED, its benefits, the key concepts instrumental to its success, the four stages of SMED, and discuss ways to analyze your changeover processes. This article was written with input from Steve Halpin, Lean Trainer and Mentor, Lean Teams.
What is SMED? The Lean Way to Reduce Changeover Time
SMED (Single Minute Exchange of Die) is a lean manufacturing method used to reduce changeover downtime to the absolute minimum.
In a typical production environment, orders often come in fixed sizes and must be executed in a specific sequence. When changeovers take hours, the schedule slows down. By minimizing changeover time, manufacturers can move between these fixed orders more fluidly, reducing bottlenecks and allowing the facility to handle a high volume of requests without losing days of productivity to setup.
Think of SMED like a Formula 1 pit stop: every second the car is stationary is a second lost on the track. The goal is to have the crew, tools, and tires ready so the actual “stop” is as quick as possible.
Where did SMED come from?
SMED was developed by Shigeo Shingo, a Japanese industrial engineer, around the 1950s. By developing the system, he revolutionized manufacturing at Toyota within the broader Toyota Production System (TPS). The term “single-minute” was used to describe the achievement of a die change that used to take hours being done in less than 10 minutes.
The Key Benefits of SMED
Reducing downtime spent on changeovers has many benefits for your operations. Here are the key benefits that impact manufacturers:
- Avoiding Overproduction and Waste
Toyota describes overproduction as the biggest waste of all. Overproduction means inventory, which means storage (ergonomics/motion), which needs handling, sorting, counting (overprocessing), and movement (transport), and all of this can lead to rework, errors, or obsolescence (defects). Longer production runs generally mean longer average lead times, which incurs the waste of waiting. By making changeovers fast and frequent, you can produce exactly what the customer ordered, eliminating the need to overproduce “just-in-case” stock. - Lower Manufacturing Costs
SMED impacts your bottom line. Simply put, reduced downtime means lower labor costs per unit. - Standardized Changeover Procedures
Implementing SMED allows you to standardize changeover practices across your shift teams and factories. This reduces human error, ensures you’re using the most optimal processes across shifts and locations, and speeds up training new staff. - Improved Operational Capacity
Every hour saved during a changeover is an hour of “found” capacity. By reducing the time a machine sits idle, you lower your operational overhead per unit. This allows you to increase your total output without investing in new equipment or additional floor space.
Real-World Impact: SMED at Tosara Pharma
Steve shared a case study from Lean Teams, where SMED proved extremely effective. Using SMED and TPM (Total Productive Maintenance), Tosara Pharma (the makers of Sudocrem) reduced the average time for a SKU (size) changeover on packaging lines from 8 hours to 1.5 hours.
Read the full case study.
The Key Concept: Internal Vs. External Activities
Understanding and separating internal and external activities is one of the most important distinctions when it comes to implementing SMED. When going through the process, you need to separate all activities involved in preparing for and performing the changeover.
These should be separated into two columns. Internal activities include any actions that must be taken while the machine is stopped to be done correctly and safely. External activities are actions performed while the machine is running — this is the key to creating the most efficient process possible. Here are some examples of each:
| Internal Activities | External Activities |
| Removing protective guards | Gathering tools and raw materials |
| Replacing old tools/dies | Finding and reviewing paperwork |
| Cleaning | Returning old tools to storage |
| Connecting appliances/utilities (eg, water, air) | Checking new tools/dies for damage |
| Clearing/flushing the machine of current materials | Placing new tools/materials next to the machine |
| Trial runs and adjustments | Pre-heating/setting tools |
Note: As with many other lean manufacturing tools and techniques, SMED should be used in coordination with other lean methods for continuous improvement. For example, to be as efficient as possible in finding and replacing new tools, you can implement the 5S lean methodology.
The 4 Stages of SMED
Depending on how granular you look at it, you can break SMED down into many steps. Here, we discuss the 4 main stages of SMED that manufacturers should follow when implementing SMED on the shop floor.
Stage 1: Assess and document the current state
Before being able to implement improvements, you need to know exactly what state your operations are currently in. One of the most effective ways to do this is to take a video recording of your entire operating line. At this stage, Internal tasks (performed while the machine is stopped) and External tasks (performed while the machine is running) are being done at the same time without distinction.
Stage 2: Separate Internal and External Elements
This is the most vital stage and is often where you will identify areas to reduce downtime. Your main goal here is to identify tasks that were done while the machine was off that could have been done while it was running.
Stage 3: Convert Internal to External
This is where you find improvements. Look at the tasks that must be done while the machine is stopped and ask: “How can we do this while the machine is still working?”
For example, instead of waiting for a die to heat up inside the machine, use a pre-heating station so the die is at temperature the moment it’s installed.
Stage 4: Streamline All Aspects
Once you’ve moved everything possible to “External,” focus switches to making the remaining “Internal” tasks faster.
For example, you could use functional clamps instead of bolts (one turn instead of many), implement one-touch settings, and eliminate usual adjustments.
How SMED Impacts OEE
SMED helps you work faster and more efficiently, but it also makes your equipment more effective. Here is how it impacts the three pillars of OEE (Overall Equipment Effectiveness):
Availability
Every minute saved during a changeover is a minute added back to your planned production time. Reducing a 60-minute setup to 10 minutes gives you 50 minutes of capacity, rapidly improving your availability.
Performance
SMED helps to reduce time spent slowly ramping up machinery. By standardizing settings, machines can hit their target speed immediately rather than idling while an operator tweaks the dials.
Quality
Most scrap is produced during the first few minutes of a run. SMED’s focus on first-time-right settings ensures that the first part off the line is a good part, keeping your quality score high.
Real-time OEE Software
Discover the true potential of your factory. Free for 30 days.
How to Analyze Changeover Time and Manage Checks
Once you implement SMED, you need a way to measure your results, and a method to ensure your new, faster processes remain in your workflow. Production monitoring systems allow you to track your changeovers and report on how long they are taking out of your shift time.
Identify your hidden downtime
Many manufacturers track changeovers manually, which often leads to approximate numbers and inaccurate data. As well as viewing your planned and unplanned downtime, and changeovers in real time, Evocon Reports provides a downtime report, where you can view your changeovers by machine, product group, product, shift, and operator.
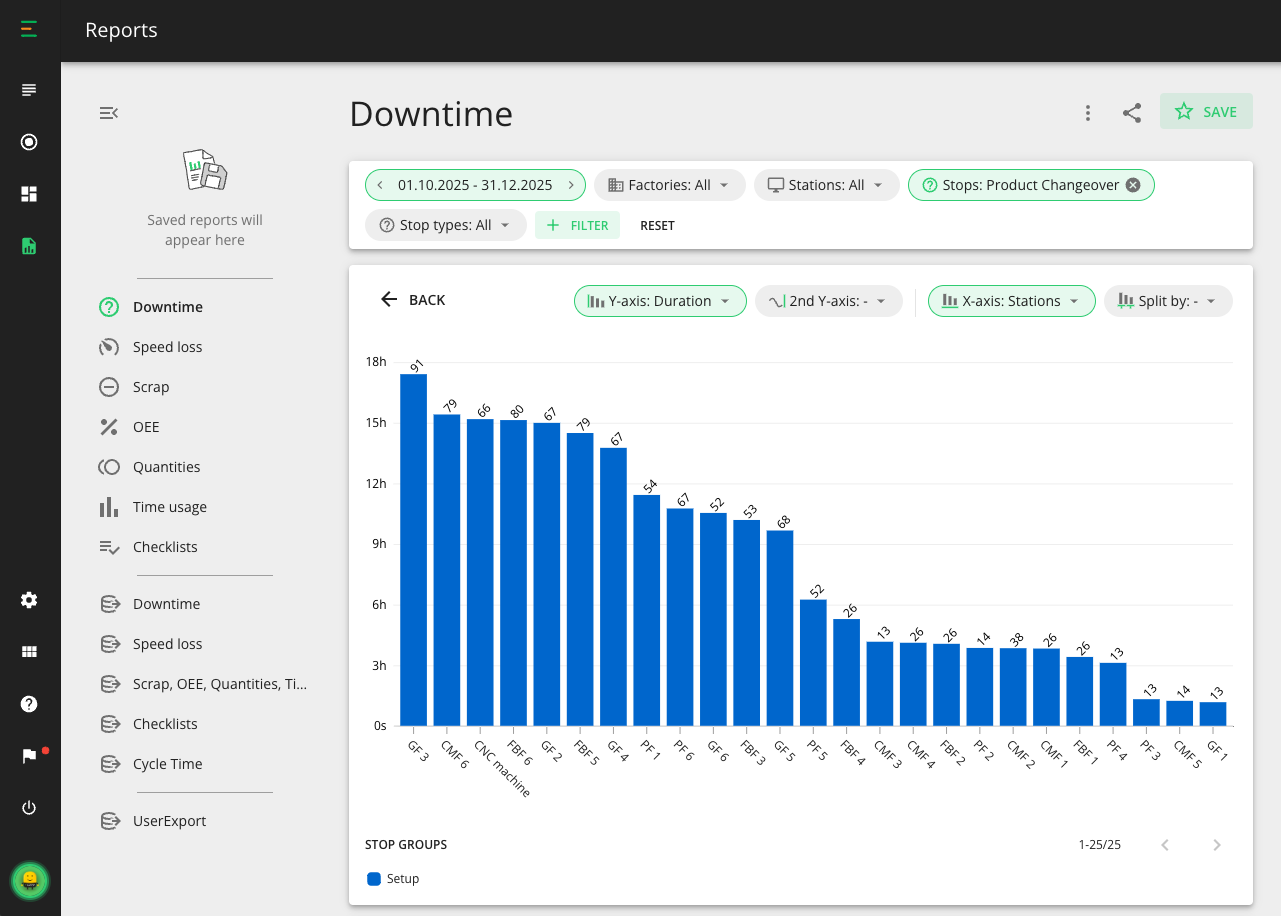
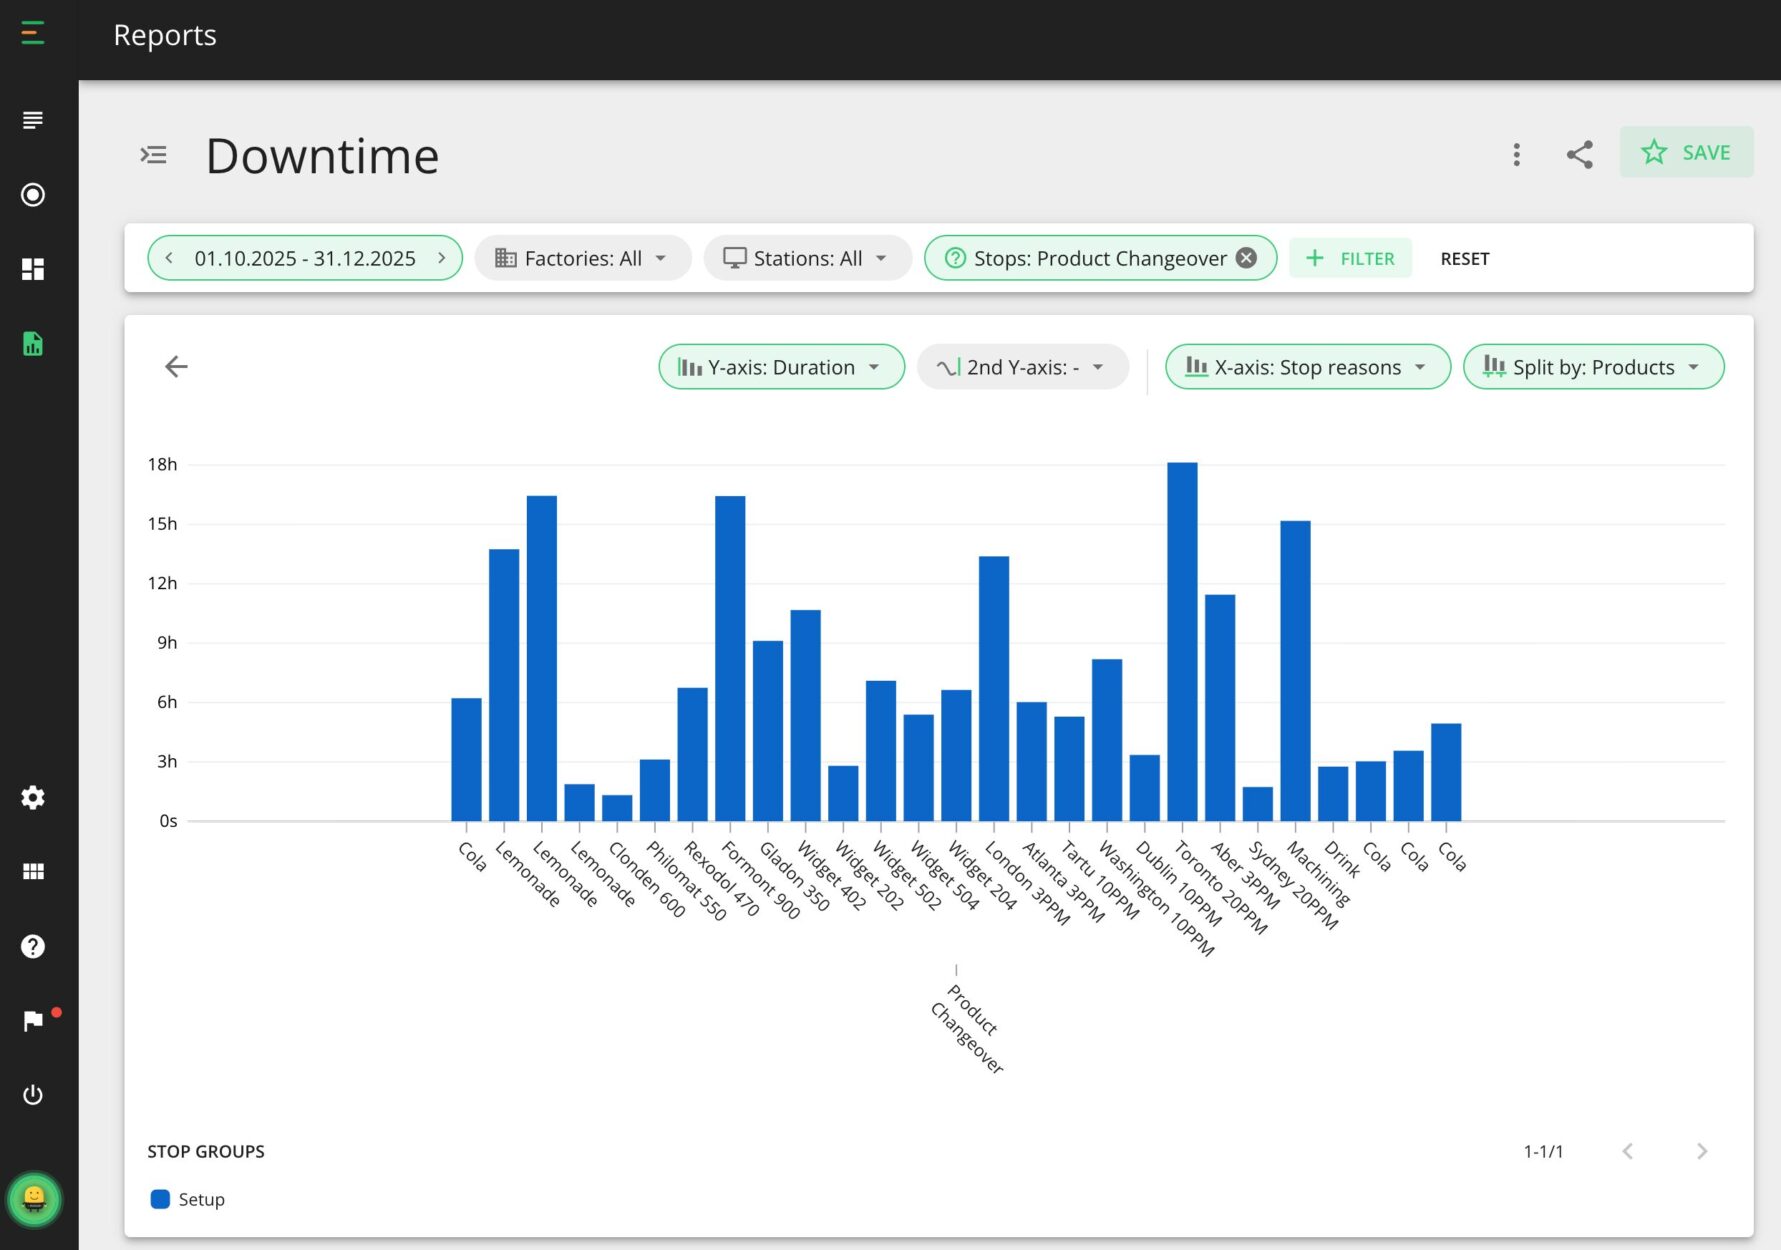
Once you identify which changeovers are taking the longest, you can start figuring out the most important question: Why?
Standardize With Checklists
The biggest challenge with SMED is maintaining your new standards moving forward. There is a risk that operators will return to old, slower habits. Evocon Checklists help to keep everyone on track. Here are some examples of how Checklists can be used for both external and internal checks.
- Pre-changeover Check (External)
You can configure a checklist that must be completed before the changeover is allowed to start. This ensures that tools, paperwork, and materials are staged at the machine while it is still running. - The Setup Guide (Internal)
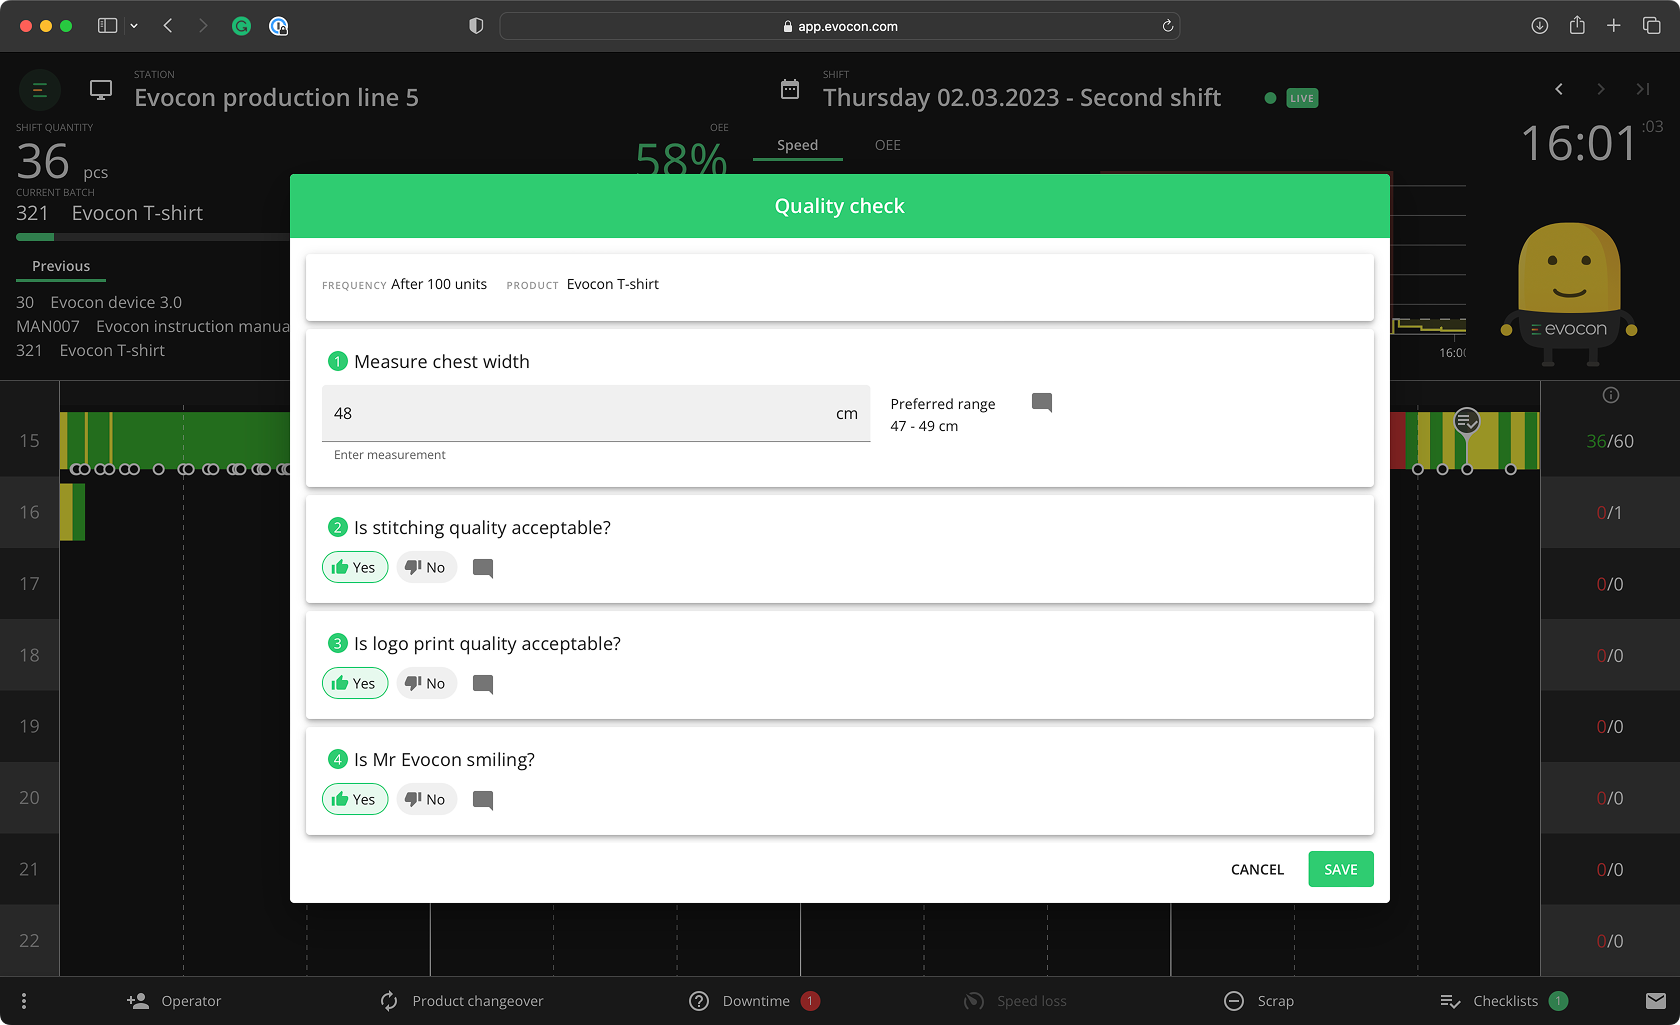
Guide your team through the physical changeover with step-by-step instructions. This ensures that every shift uses the “one-turn” fasteners or specific settings you identified in Stage 4. - Quality Checks
Ensure your production is running smoothly and products are correct with a quality check during production. This helps to identify and reduce scrap, saving you time and increasing quality and reliability.
By digitizing these checks, you aren’t just telling your team to work faster, but are giving them the tools to work smarter and providing management with the data to prove it.
Key Takeaways
The primary objective of SMED is to drastically reduce changeover time. By doing so, you gain the flexibility to move through your order queue more fluidly, making you much faster at responding to tight deadlines or sudden customer requests.
The success of SMED is in the preparation. The biggest time savings don’t come from people rushing around or working harder; they come from shifting “Internal” tasks to “External” ones. If you can get every tool, part, and document ready while the machine is still running, you cut out the time spent searching and preparing, which damages your productivity.
If you want to measure your success, OEE (Overall Equipment Effectiveness) is the perfect metric. By reducing changeovers, you reclaim lost time (Availability) and eliminate the “trial-and-error” adjustments that cause scrap (Quality). It ensures your machine runs correctly the moment it restarts.
Though it may seem easy to have one good day, keeping those improvements permanent is the real challenge. Digital tools like Evocon help you keep an eye on real-time performance, while digital Checklists ensure that your best practices become the only way across every shift.